Site Preparation
Before the assembly of an oak frame building commences, the ground needs to be prepared and foundations put in place and site preparation is the first part of the overall build process. Due to the density of oak the timber is surprisingly heavy and full foundations are required to support the structure. Albion Oak will supply CAD drawing for a builder to put in the foundations although the depth and type of foundation does depend on the ground conditions. Whether it’s a supply only kit or full build we supply full instructions for the assembly team to construct the frame.
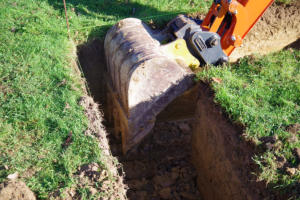
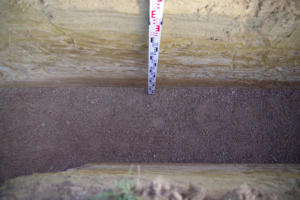
Builders or groundworkers typically provide only an estimate for the works, as underground conditions are
often uncertain however a metre deep strip footing is the most common.
Key Points
1. Site Preparation
Goal: Create a clean, level, and stable area ready for building.
Step 1: Site Survey and Layout • Land surveying: A licensed surveyor maps the property’s boundaries, slope, and features. • Staking out: Builders mark where the house will sit using stakes and strings (known as batter boards and string lines). • Orientation: The layout ensures correct positioning for sunlight, views, and drainage. Step 2: Clearing and Excavation • Clearing: Remove vegetation, trees, rocks, and debris. • Topsoil removal: Strip the top 6–12 inches of soil, as it’s usually too soft for construction. • Excavation: Dig trenches or a hole for the foundation (depending on whether it’s a slab, crawl space, or basement). Step 3: Grading and Drainage • Grading: The ground is levelled and shaped to slope slightly away from the house for proper drainage. • Compaction: Soil is compacted using heavy machinery to prevent future settling. • Erosion control: Install silt fences or drainage ditches to prevent soil erosion, especially on sloped lots. Step 4: Utilities Preparation • Utility trenches: Dug for water, gas, electricity, and sewer lines before foundation work starts. • Temporary services: A temporary electrical panel or water supply might be installed for construction use.2. Foundation Construction
Goal: Build a solid, level base that supports the entire house and transfers its weight
safely into the ground.
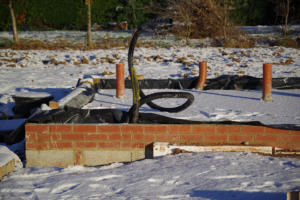
Step 1: Setting the Footings • Formwork: Wooden or metal moulds outline the shape of the footings. • Reinforcement: Steel rebar is placed inside for strength. • Concrete pouring: Concrete is poured into the forms, typically 8–12 inches thick and wider than the foundation walls. • Curing: The concrete hardens over several days to gain full strength. Step 2: Building the Foundation Walls (if not slab-on- grade) • Forming: Concrete forms or concrete blocks are used to build vertical walls on top of the footings. • Rebar placement: Reinforcement rods tie walls to the footings. • Concrete pouring: For poured foundations, concrete is poured into forms and allowed to cure. • Anchor bolts: Bolts are embedded in the top of the walls to secure the wood framing later. Step 3: Waterproofing and Drainage • Damp-proofing: Apply bituminous coating or waterproof membranes to the exterior walls. • Drainage tile or pipe: Perforated drainpipes are laid around the base to divert groundwater away. • Gravel backfill: Backfill with gravel or coarse material to promote drainage and prevent pressure build-up. Step 4: Slab or Basement Floor • Base preparation: Spread gravel (4–6 inches) and compact it. • Vapour barrier: A plastic sheet is laid to block moisture. • Reinforcement: Wire mesh or rebar grid added for strength. • Concrete slab pouring: Concrete is poured and levelled with a screed. • Finishing: Surface is trowelled smooth or brushed for texture. • Curing: Concrete cures for several days before framing begins. Once the foundations and dwarf wall are cured the frame can then be assembled before the roof is tiled and any joinery fitted to create a watertight shell.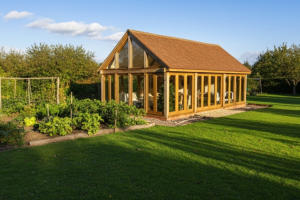




© 2016
Site Preparation
Before the assembly of an oak frame building commences, the ground needs to be prepared and foundations put in place and site preparation is the first part of the overall build process. Due to the density of oak the timber is surprisingly heavy and full foundations are required to support the structure. Albion Oak will supply CAD drawing for a builder to put in the foundations although the depth and type of foundation does depend on the ground conditions. Whether it’s a supply only kit or full build we supply full instructions for the assembly team to construct the frame.

Builders or groundworkers typically provide only an estimate for the works, as
underground conditions are often uncertain however a metre deep strip footing
is the most common.
Key Points
1. Site Preparation
Goal: Create a clean, level, and stable area ready for building.
Step 1: Site Survey and Layout • Land surveying: A licensed surveyor maps the property’s boundaries, slope, and features. • Staking out: Builders mark where the house will sit using stakes and strings (known as batter boards and string lines). • Orientation: The layout ensures correct positioning for sunlight, views, and drainage. Step 2: Clearing and Excavation • Clearing: Remove vegetation, trees, rocks, and debris. • Topsoil removal: Strip the top 6–12 inches of soil, as it’s usually too soft for construction. • Excavation: Dig trenches or a hole for the foundation (depending on whether it’s a slab, crawl space, or basement). Step 3: Grading and Drainage • Grading: The ground is levelled and shaped to slope slightly away from the house for proper drainage. • Compaction: Soil is compacted using heavy machinery to prevent future settling. • Erosion control: Install silt fences or drainage ditches to prevent soil erosion, especially on sloped lots. Step 4: Utilities Preparation • Utility trenches: Dug for water, gas, electricity, and sewer lines before foundation work starts. • Temporary services: A temporary electrical panel or water supply might be installed for construction use.2. Foundation Construction
Goal: Build a solid, level base that supports the entire house
and transfers its weight safely into the ground.
Step 1: Setting the Footings • Formwork: Wooden or metal moulds outline the shape of the footings. • Reinforcement: Steel rebar is placed inside for strength. • Concrete pouring: Concrete is poured into the forms, typically 8–12 inches thick and wider than the foundation walls. • Curing: The concrete hardens over several days to gain full strength. Step 2: Building the Foundation Walls (if not slab-on-grade) • Forming: Concrete forms or concrete blocks are used to build vertical walls on top of the footings. • Rebar placement: Reinforcement rods tie walls to the footings. • Concrete pouring: For poured foundations, concrete is poured into forms and allowed to cure. • Anchor bolts: Bolts are embedded in the top of the walls to secure the wood framing later. Step 3: Waterproofing and Drainage • Damp-proofing: Apply bituminous coating or waterproof membranes to the exterior walls. • Drainage tile or pipe: Perforated drainpipes are laid around the base to divert groundwater away. • Gravel backfill: Backfill with gravel or coarse material to promote drainage and prevent pressure build-up. Step 4: Slab or Basement Floor • Base preparation: Spread gravel (4–6 inches) and compact it. • Vapour barrier: A plastic sheet is laid to block moisture. • Reinforcement: Wire mesh or rebar grid added for strength. • Concrete slab pouring: Concrete is poured and levelled with a screed. • Finishing: Surface is trowelled smooth or brushed for texture. • Curing: Concrete cures for several days before framing begins. Once the foundations and dwarf wall are cured the frame can then be assembled before the roof is tiled and any joinery fitted to create a watertight shell.










 About
About
 Products
 Quotations
 Technical
 News
News
 Blog
Blog
 Inspiring Oak Frame Extension Ideas for Your Home
- Which Extension Style Should You choose?
 Jungle of Regulation Is Choking Small-Scale Development
 Is an Oak Frame Conservatory the Perfect Extension for Your Home?
 Oak Frame Flat Roof Extensions
 What should I consider when designing an oak frame extension?
 Contact
 Frequently Asked Questions
 Self Build
 Oak Frame Design
 Grades of Oak
 Longevity of Oak
 Services
 The Process
 Design Requirements
 Site Preparation
 Sustainability
 Construction Methods
 Feasibility Study
 Gallery
 Garages
 Single Storey Garages
 Two Storey Garages
 Garage Complexes
 Extensions
 Garden Rooms
 More Info
 Conservatories
 More Info
 Traditional Orangeries
 Mansard Orangeries
 Garden Buildings
 Annexes
 Entertainment Spaces
 Home Offices
 Shelters
 Pool Buildings
 Stables
 House Designs
 Commercial
 Barn Buildings
 Sport Buildings
 Bespoke Buildings
 Single Storey Garage
 Two Storey Garage
 Garden Rooms, Orangeries & Offices
 Design
 Architectural Design
 Case Studies
 Oak Framing History
 Glossary of Oak Framing
 Oak Patina
 Garage Frame Sections
 Cladding
 Planning
 Planning Reports
 Building Regulations
 Non-Designated Heritage Assets
 Caravan Sites
 Groundworks
 Assembly
 Supply Only Kits
 Turnkey Projects
 Joinery
 Glazing Options
 Lanterns
 Roof Works
 Roof Styles
 Roof Trusses
 Roof Tiling
 Albion Oak
 Employee of the Month
menu html5 by Css3Menu.com


© 2016 - Need help? Contact us on 07967 778808
